The Sight Reduction Tables for Marine Navigation HO 229
Introduction
The fundamental principle is that HO 229 is not a different method from the Saint-Hilaire method. Rather, it is an extensive collection of precomputed solutions to the astronomical triangle. The tables contain approximately 1.5 million entries.
Learning to Reduce a Sun Sight
The aim of this page is to make the use of HO 229 sight reduction tables for Sun sights as simple and practical as possible.
We will first explain the procedure step by step, then work through eight examples and exercises to help you become familiar with the method.
At first, sight reduction may seem complicated. However, with regular practice, the steps soon become familiar. After completing these exercises several times, you should be able to reduce a Sun sight and obtain your line of position at sea in less than five minutes, without needing a scientific calculator.
The goal is not simply to follow a set of instructions, but to understand the procedure well enough for it to become second nature when navigating at sea.
How the HO 229 Method Works
An Assumed Position (AP) is selected near the Dead Reckoning (DR) position. Its latitude is a whole number of degrees, and its longitude is chosen so that the Local Hour Angle (LHA) is also a whole number of degrees.
The tables provide the computed altitude (Hc) and the tabular azimuth angle (Z). A correction is then applied to Hc to account for the remaining minutes of declination.
The final computed altitude (Hc) is compared with the observed and corrected altitude (Ho) to determine the intercept.
The HO 229 tables can be used for the Sun, Moon, planets, and stars. However, the easysextant website focuses exclusively on their use for Sun sights.
One of the main advantages of these tables is that they eliminate the need to solve spherical trigonometric equations using a scientific calculator.
Once you understand their layout and know how to enter the tables correctly, sight reduction can be both quick and efficient.
Obtaining the Sun’s GHA and Declination
Although the HO 229 tables can be used to calculate the Sun’s Greenwich Hour Angle (GHA) and declination up to 2036, this approach requires additional calculations and relies on approximations that may reduce precision.
The easysextant Simplified Sun Nautical Almanac provides a simpler and more convenient alternative, giving the Sun’s GHA and declination directly from high-precision astronomical data.
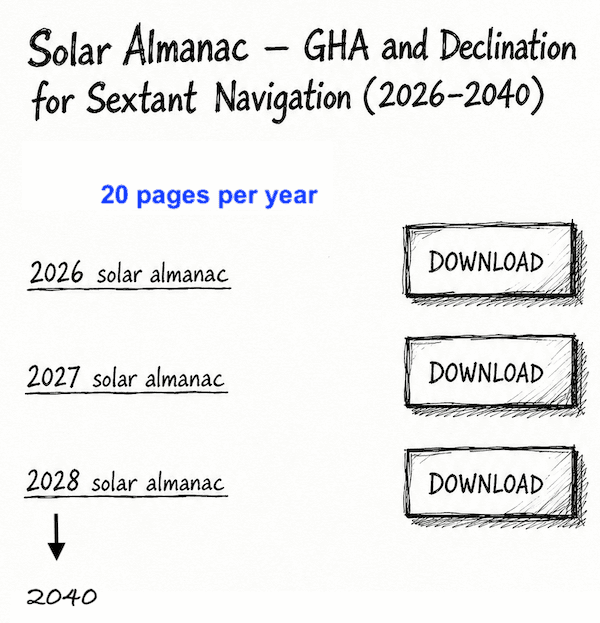
Covering the years 2026 to 2040, the almanac consists of just 20 pages per year, all available for free download.
HO 229 Publications and Free PDF Downloads
These tables are permanent and are published in six volumes, each covering a 15° latitude band: 0°–15°, 15°–30°, and so on.
The concept, design, development, and preparation of these tables are the result of the collaborative efforts of the National Imagery and Mapping Agency, the U.S. Naval Observatory, and Her Majesty’s Nautical Almanac Office, Royal Greenwich Observatory.
The same tabular material has also been published in the United Kingdom by the Hydrographic Department, Ministry of Defence (Navy), as N.P. 401.
Source: U.S. National Imagery and Mapping Agency (NIMA), now the National Geospatial-Intelligence Agency (NGA).
Publication: Pub. No. 229 — Sight Reduction Tables for Marine Navigation.
Copyright: U.S. Government publication. No domestic copyright claimed under Title 17 U.S.C.
These files are provided free of charge for convenient access. This website is not affiliated with or endorsed by NGA.
Volume 1 HO 229 LATITUDES 0°−15°, Inclusive
https://maritimesafetyinnovationlab.org/wp-content/uploads/2015/01/229-vol-1.pdf
Volume 2 HO 229 LATITUDES 15°−30°, Inclusive
https://maritimesafetyinnovationlab.org/wp-content/uploads/2015/01/229-vol-2.pdf
Volume 3 HO 229 LATITUDES 30°−45°, Inclusive
https://maritimesafetyinnovationlab.org/wp-content/uploads/2015/01/229-vol-3.pdf
Volume 4 HO 229 LATITUDES 45°−60°, Inclusive
https://maritimesafetyinnovationlab.org/wp-content/uploads/2015/01/229-vol-4.pdf
Volume 5 HO 229 LATITUDES 60°−75°, Inclusive
https://maritimesafetyinnovationlab.org/wp-content/uploads/2015/01/229-vol-5.pdf
Volume 6 HO 229 LATITUDES 75°−90°, Inclusive
https://maritimesafetyinnovationlab.org/wp-content/uploads/2015/01/229-vol-6.pdf
For practical navigation, a printed copy of the volume covering your sailing latitudes, available from specialist marine booksellers, is a must. It remains especially valuable when navigating without any electronic assistance.
The PDFs provided here are intended mainly for study and training, to help you become familiar with the tables and their use.
To fully understand the use of the different sight-reduction tables—and, in our case, their use specifically for Sun sight reduction—you must first be able to calculate the LHA, Declination, and observed altitude (Ho) of the Sun corresponding to the exact time of the Sun sight observation. This is covered in Part One of the worksheet.
Preparation
FIRST PART OF THE WORKSHEET
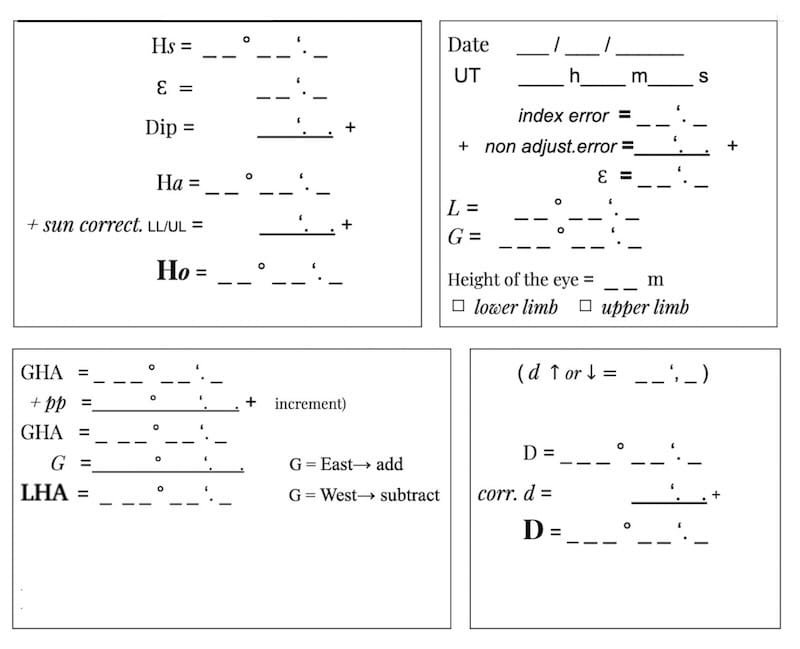
Part One is common to all the methods that follow for obtaining our final line of position.
This knowledge can be acquired on this website by following the “La Rochelle” exercise and then practising with the seven similar, fully worked-out exercises provided.
Instructions HO 229:
Before entering the HO 229 tables, we must determine three whole-degree values: the Assumed Latitude, the Local Hour Angle, and the whole-degree declination.
Step 1 – Determine the Assumed Latitude
Round the Dead Reckoning (DR) latitude (L) to the nearest whole degree. This becomes the Assumed Latitude (La).
Examples:
- L = 52°16′ → La = 52°
- L = 52°34′ → La = 53°
Step 2 – Round the Local Hour Angle
Round the calculated LHA to the nearest whole degree.
Examples:
- LHA = 332°25′ → 332°
- LHA = 332°37′ → 333°
Step 3 – Determine the Declination Increment
Take the whole-degree part of the Sun’s declination without rounding up. The remaining minutes are called the Declination Increment (Dec. Inc.).
Example:
D = 18°46′ N
- Whole-degree declination: D = 18° N (without rounding up)
- Declination Increment: Dec. Inc. = 46′
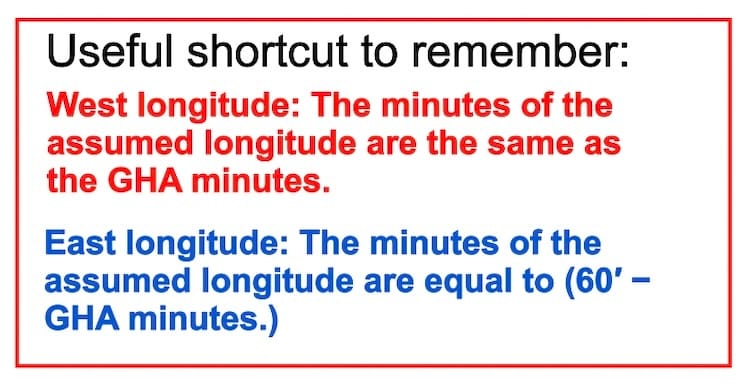
Step 4 – Determine the Assumed Longitude
Adjust the DR longitude so that the LHA becomes a whole number of degrees. This longitude is called the Assumed Longitude (Ga).
The first three steps are straightforward. However, determining the Assumed Longitude can be slightly more challenging.
The following four examples illustrate how to calculate it.
First, round the calculated LHA to the nearest whole degree. Then adjust the DR longitude to obtain that exact LHA.
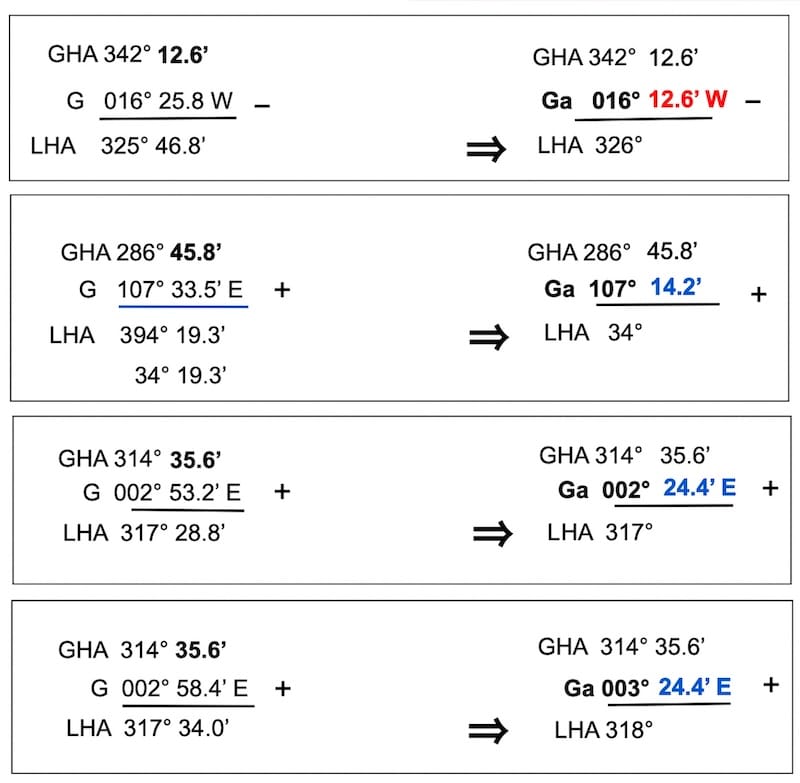
Values Obtained
La — Assumed Latitude
Ga — Assumed Longitude
To enter the HO 229 tables correctly, you need three values expressed in whole degrees: the Local Hour Angle (LHA), the Assumed Latitude (La), and the Sun’s declination (D).
Then, using the LHA page, the La and D values, and the corresponding same-name/contrary-name page in HO 229, we obtain:
( Hc d Z )
Hc — Tabulated altitude
d — Altitude difference
Z — Tabular azimuth angle
Understanding the Layout of HO 229
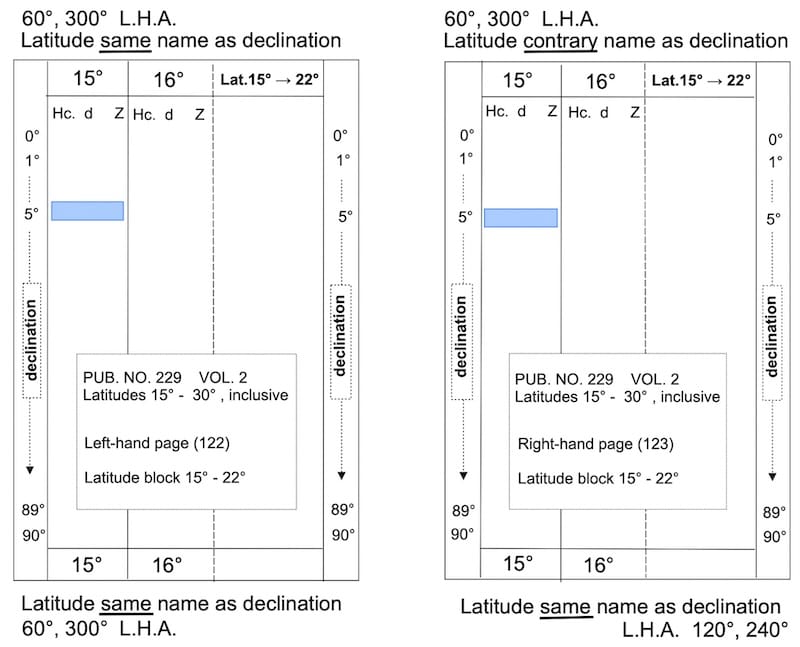
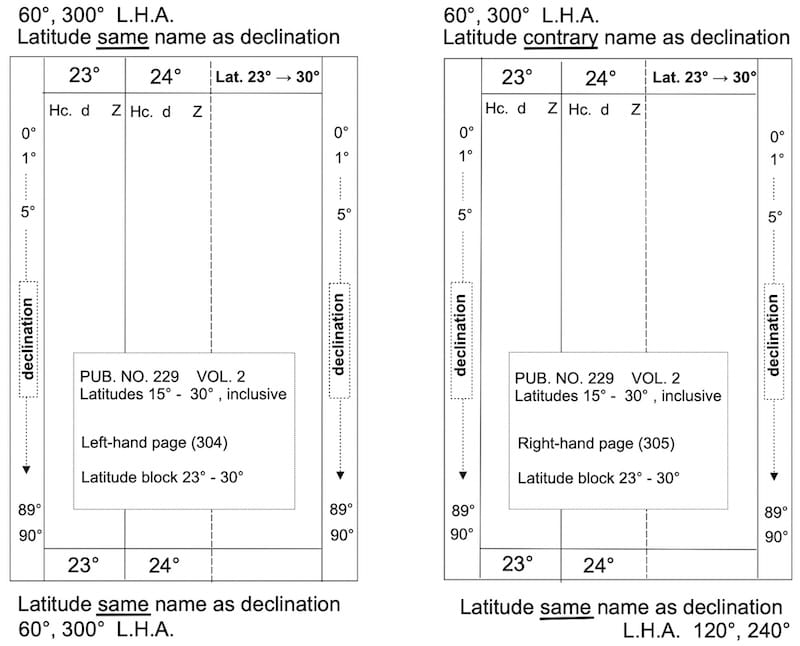
For example, HO 229 Volume 2 covers latitudes 15° to 30°. For each LHA page, the latitude range is divided into two blocks:
15°–22° (Figures 1 and 2)
23°–30° (Figures 3 and 4)
Each latitude block occupies a two-page spread.
Latitude block 15° – 22° (left-hand and right-hand pages)
Latitude block 23° – 30° (left-hand and right-hand pages)
Left-hand page – Latitude and Declination of the Same Name
This page is used when the latitude and declination are both north or both south.
The relevant LHA values, between 0°–90° or 270°–360°, are printed at the top and bottom of the page.
Right-hand page – Latitude and Declination of Contrary Names
This page is used when the latitude and declination are in opposite hemispheres.
The relevant LHA values, between 0°–90° or 270°–360°, are printed at the top of the page.
The lower section of the right-hand page is used for same-name cases with LHA values between 90° and 270°.
These cases have limited practical application for ordinary Sun sights, except under certain conditions at very high latitudes.
There is no corresponding contrary-name section.
Only cases in which the Sun was above the horizon and was actually observed with our sextant are considered.
This simplifies the explanation and eliminates the need to discuss the C–S line extending across the right-hand page.
LHA between 0°–90° or between 270°–360°
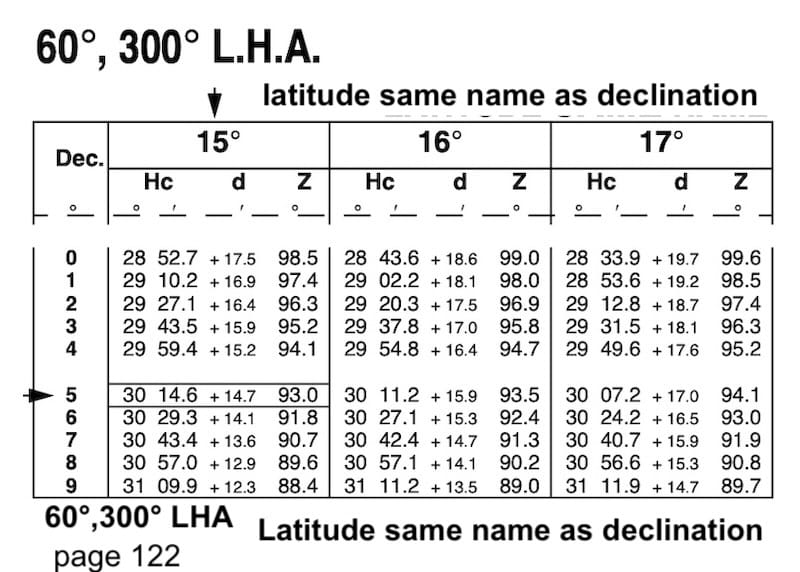
Left-hand page example
LHA = 60° (top and bottom of the page)
Same name as declination
Latitude = 15° N
Declination = 5° N
or
Latitude = 15° S
Declination = 5° S
Tabular altitude Hc = 30° 14.6’
Altitude difference d = +14.7’
Azimuth angle Z = 93°
LHA between 0°– 90° or between 270°– 360°
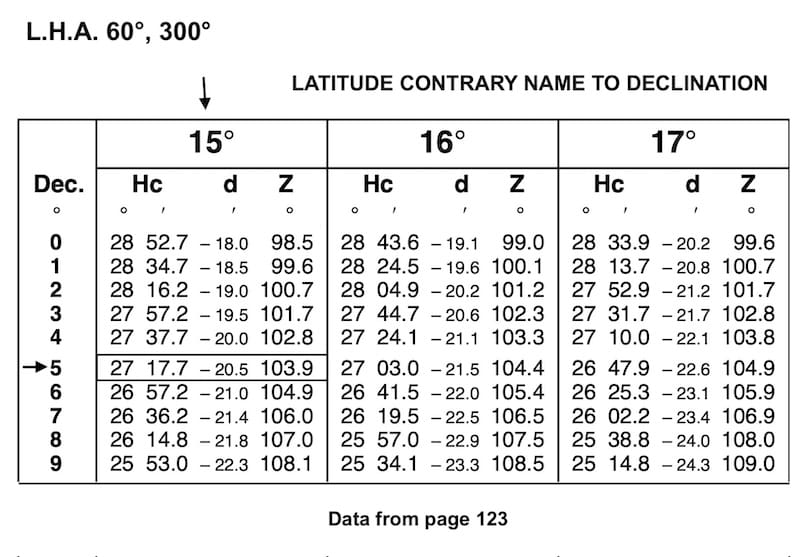
Right-hand page example
LHA = 60° (top of the page)
Contrary name to declination
Latitude = 15° S
Declination = 5° N
or
Latitude = 15° N
Declination = 5° S
Tabulated altitude Hc = 27°17.7′
Altitude difference d = − 20.5’
Azimuth angle Z = 103.9°
Correcting Hc for the Declination Increment
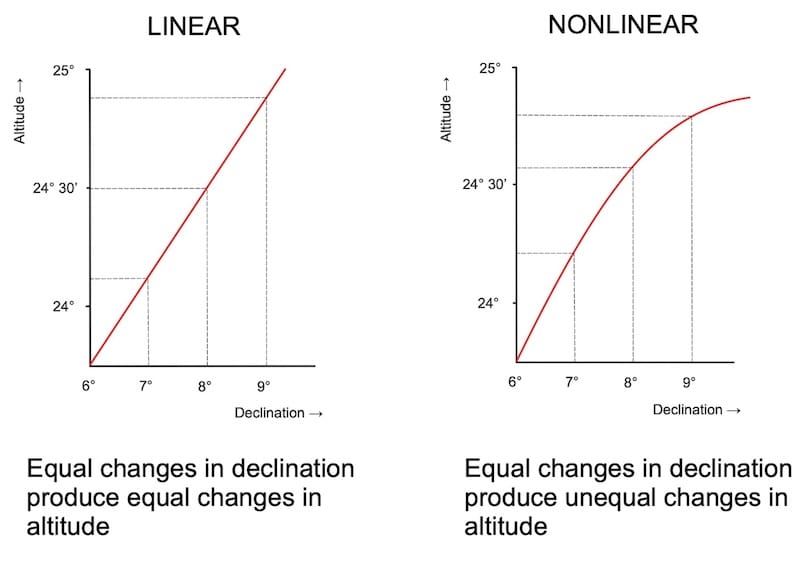
The tabulated altitude (Hc) must be corrected for the minutes of declination remaining after the whole-degree value has been selected.
This correction assumes that the computed altitude changes approximately linearly with declination over the interval considered.
Method 1 – Direct Calculation
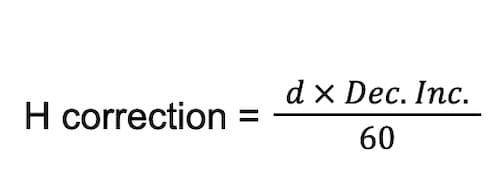
add or subtract according to the + or – sign of d
Final Hc = Hc +/- H correction.
Example:
LHA = 60°
Dead Reckoning Latitude = 15° 22’N ⇒ Assumed Latitude = 15° N
Declination (Sun) = 5° 45.5’ N ⇒ D = 5° N and Dec.Inc. = 45.5’
Latitude and declination have the same name.
Tabular altitude Hc = 30° 14.6’
Altitude difference d = +14.7’
Azimuth angle Z = 93°
H correction = +14.7′ × 45.5′ / 60 = + 11.1’
Final Hc = 30° 14.6’ + 11.1’ = 30° 25.7’
Method 2 – HO 229 Interpolation Tables
H correction with HO 229 interpolation tables (four pages)
The HO 229 interpolation table is comparatively complex to use. It requires the user to follow the explanatory procedure and determine the correction to tenths of a minute, which increases the possibility of reading or calculation errors.
Declination = 5° 45.5’ N ⇒ D = 5° N and Dec.Inc. = 45.5’
d = 14.7’
1 represents the tens digit, 4 the units digit, and 7 the tenths digit.
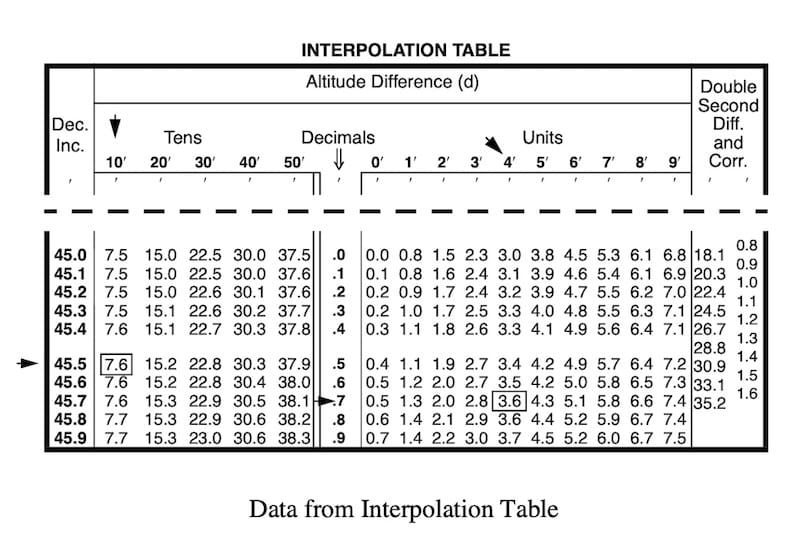
H correction is 7.6’ + 3.6’ = 11.2’
Hc final = 30° 14.6’ + 11.2’ = 30° 25.8’
Method 3 – Simplified HO 249 Table 5
Declination = 5° 45.5’ N ⇒ D = 5° N and Dec.Inc. = 45.5’
Tabular altitude Hc = 30° 14.6’
Altitude difference d = +14.7’
Azimuth angle Z = 93°
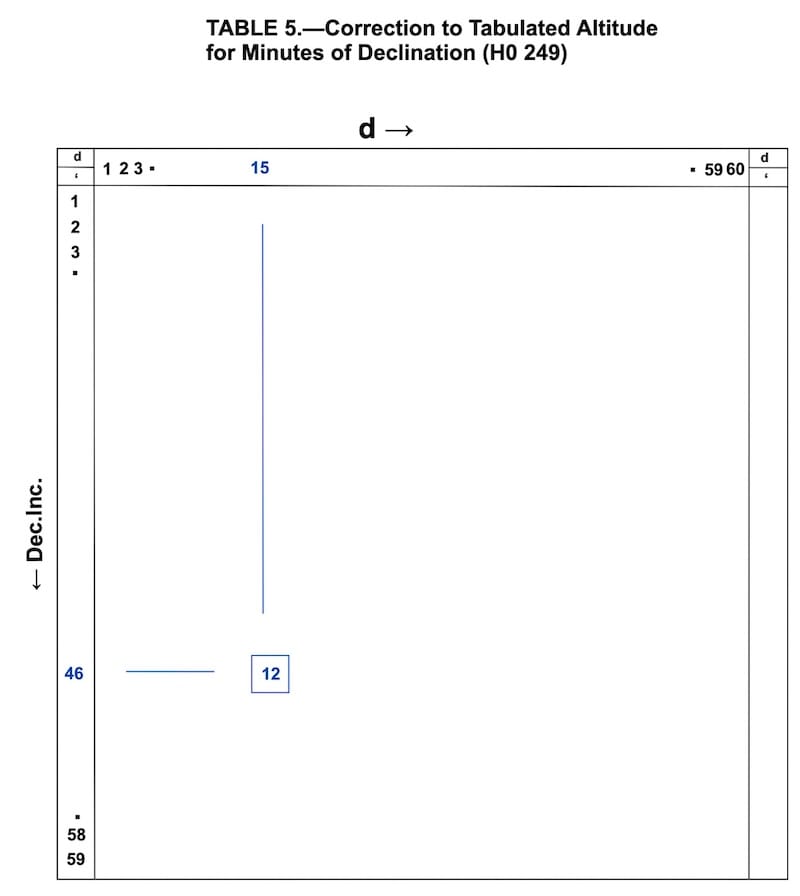
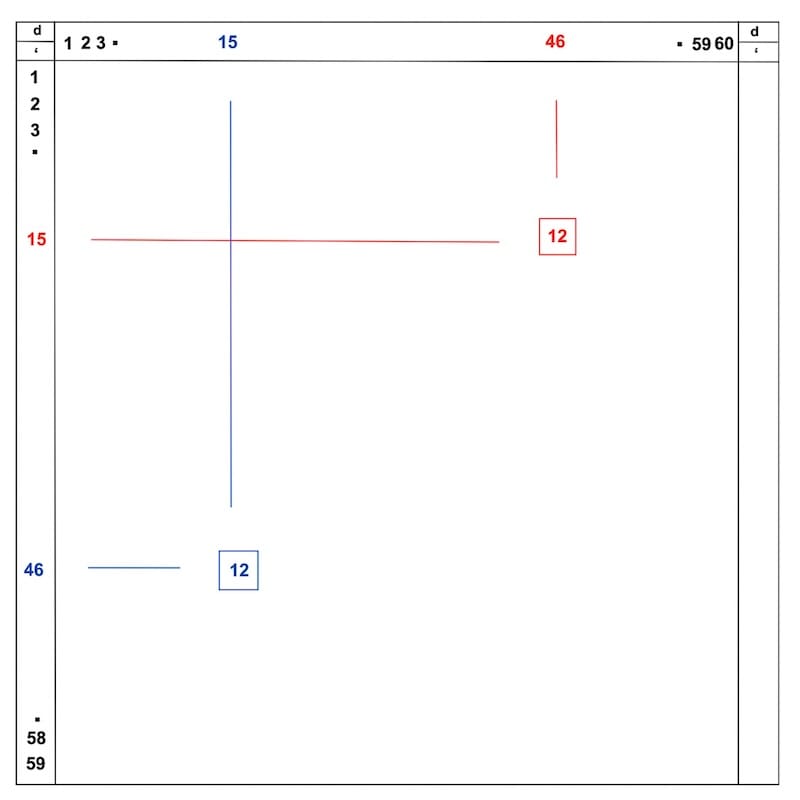
Dec.Inc. = 46’ ; d = + 15’ ⇒ H correction is 12’
Either d or Dec. Inc. may be read along the horizontal axis, with the other read along the vertical axis. The same required correction is found at their intersection.
For values from 1′ to 59′, interchanging d and the Declination Increment does not change the result because the table is symmetric about its main diagonal.
The only limitation occurs at the 0′/60′ boundaries, where the printed table is not square.
Comparing the Three Correction Methods
In this example, the altitude correction obtained from the HO 229 interpolation tables is 11.2′, whereas HO 249 Table 5 gives 12.0′.
The difference is therefore 0.8′, corresponding to 0.8 nautical mile in the resulting intercept.
Table 5 provides a convenient approximation for practical cruising.
However, when a simple calculator is available on board, the direct calculation described in Method 1 may be preferable. It gives a more precise result and is likely to be at least as quick as consulting the interpolation tables.
Practise with Eight Worked Exercises
The accompanying booklet contains eight fully worked examples designed to help you become confident in using the HO 229 tables.
By working through these exercises several times, you will develop a clear understanding of the procedure and become increasingly familiar with the tables.
Remember to master Part One of the worksheet before proceeding with HO 229 sight reduction.
Comparing Lines of Position: Calculator vs. HO 229
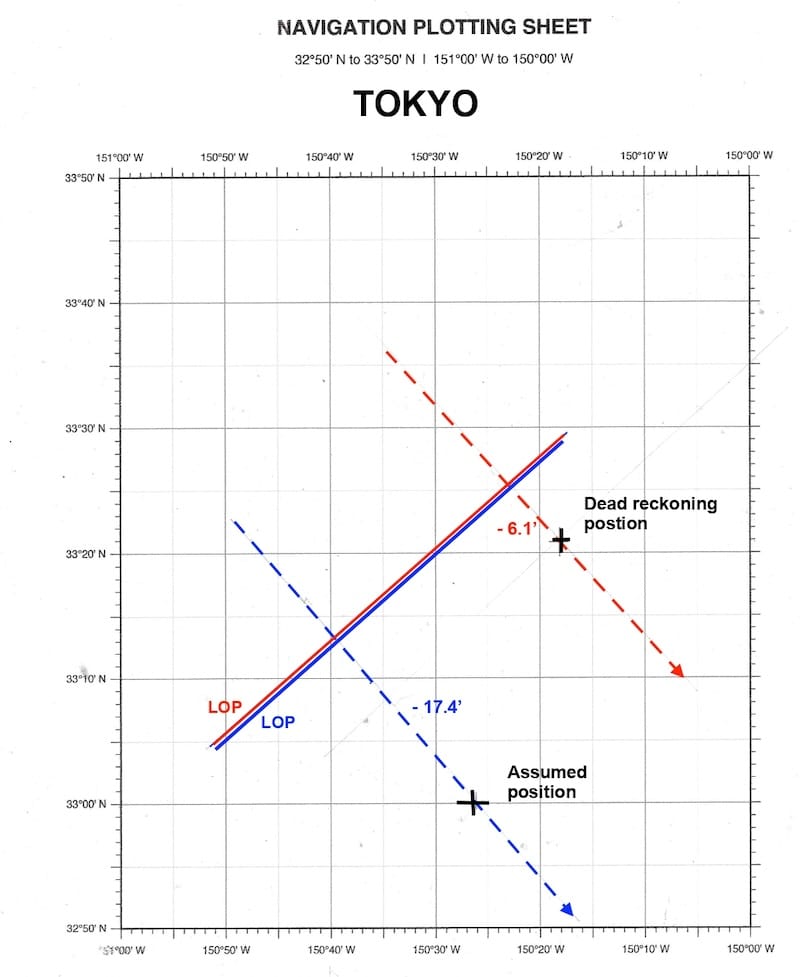
What is the difference between a Line of Position (LOP) calculated from the Dead Reckoning position using a calculator and one obtained using an Assumed Position and the HO 229 tables?
When the Assumed Position is selected correctly, both methods should produce Lines of Position that are very close together or that overlap.
The following two examples illustrate the differences in calculated intercepts and azimuths.
TOKYO:
Calculator: intercept = – 6.1’ ; Zv = 139.3°
HO 229: intercept = – 17.4′ ; Zv = 138.6°
POINTE-À-PITRE
Calculator: intercept = +3.3′ ; Zv = 119.6°
HO 229: intercept = +29.2′ ; Zv = 119.3°-À-PITRE :
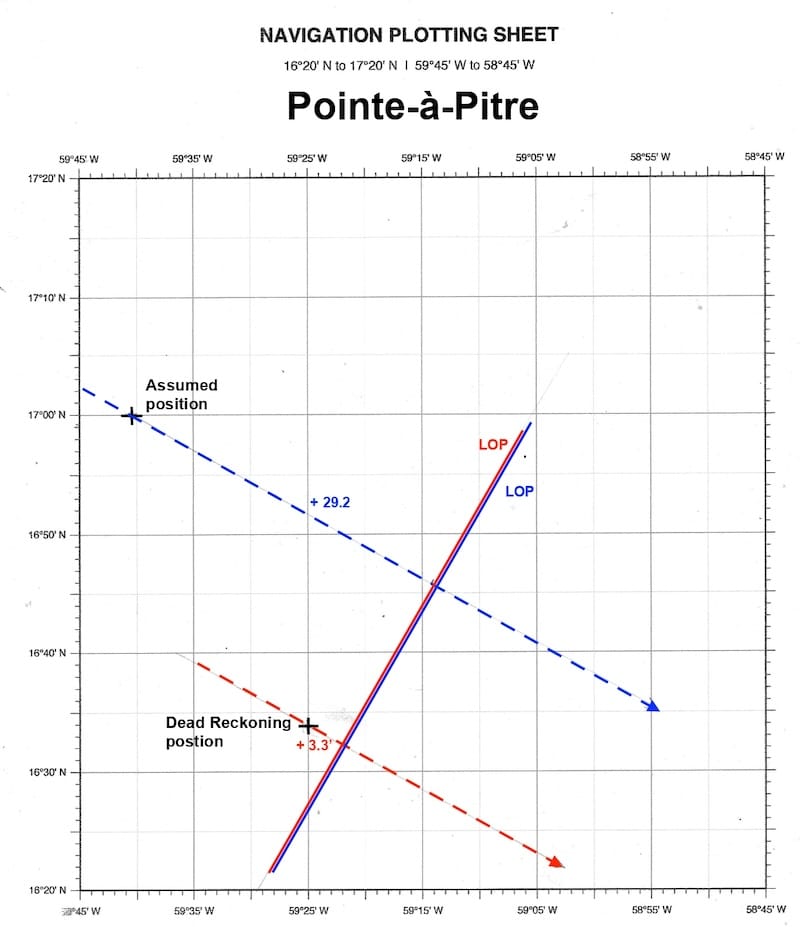
The intercept values are different because each method uses a different reference position. This does not necessarily mean that the resulting Lines of Position are different.
To compare the two methods correctly, both Lines of Position must be plotted on the same chart using their respective reference positions, intercepts, and azimuths.