USA Sight Reduction Tables for Air Navigation HO 249
UK Rapid Sight Reduction Tables for Navigation NP 303
Understanding HO 249 and NP 303
Both publications are arranged in three volumes. Volume 1 provides a particularly rapid method for reducing observations of selected navigational stars, while Volumes 2 and 3 cover different latitude ranges and can be used for observations of the Sun, Moon, planets, and suitable stars.
The Easysextant website focuses exclusively on their use for Sun sights.
Volumes 2 and 3 of the American edition, HO 249, are available for free download from this page.
Both publications provide tabulated values of calculated altitude (Hc) and true azimuth (Zn) based on the observer’s assumed latitude, local hour angle (LHA), and the declination of the observed celestial body. By comparing the calculated altitude with the observed altitude (Ho), the navigator obtains the altitude intercept, which, together with the azimuth, allows a line of position to be plotted using the Marcq St Hilaire intercept method.
The close similarity between the American and British editions is no coincidence. Their development involved cooperation between the United States and British nautical almanac authorities. Although the publications have been produced independently since the 2000 epoch, technical cooperation has continued.
In practical terms, HO 249 and NP 303 should be regarded as national editions of essentially the same sight reduction system, rather than two different methods of celestial navigation. A navigator familiar with one publication can readily use the other, subject to checking the applicable edition, instructions, and tables.
This common heritage illustrates how a method originally developed for rapid aerial navigation became an equally valuable tool for traditional marine celestial navigation.
HO 229 vs. HO 249 and NP 303: Key Differences
In HO 229, which is primarily intended for marine navigation, you first look for the appropriate LHA page.
In HO 249 and NP 303, originally designed for air navigation, you first look for the appropriate Latitude page.
HO 229, HO 249, and NP 303 use the same basic inputs—latitude, LHA, and declination—and, for identical inputs, produce essentially the same results. Their structures are also very similar.
One practical difference is that HO 229 generally provides values to one decimal place, while HO 249 and NP 303 are more heavily rounded, typically to the nearest whole minute.
Finding the Sun’s GHA and Declination
Before using the HO 249 or NP 303 tables, you must know the Sun’s Greenwich Hour Angle (GHA) and declination at the exact time of your sextant observation.
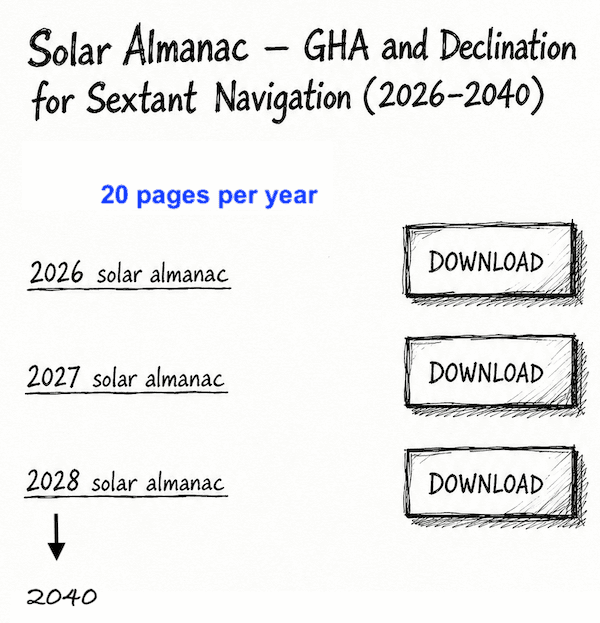
The EasySextant Simplified Sun Nautical Almanac provides these values directly from high-precision astronomical data, without the need for lengthy calculations.
Covering the years 2026 to 2040, the almanac consists of just 20 pages per year, all available for free download. the Sun’s GHA and Declination
The aim of this page is to make sight reduction tables for a Sun sight as simple and practical as possible.
We will first explain the method step by step, then work through eight practical examples and exercises, complete with detailed solutions, to help you build confidence and become familiar with the process.
These eight exercises are the highlight of this webpage, providing the key to understanding and mastering the method.
Learn Sun Sight Reduction Step by Step
At first, sight reduction can seem a little complicated, but with steady practice the steps soon become familiar. Once you have worked through these exercises a few times, you should be able to reduce a Sun sight and obtain your line of position at sea in less than five minutes — without needing a scientific calculator.
The goal is not simply to follow a set of tables, but to understand the routine well enough that it becomes second nature when you are navigating at sea.
How Sight Reduction Tables Work
An Assumed Position (AP) is selected near the estimated position, using a whole-degree latitude and a longitude chosen so that the LHA (Local Hour Angle) is a whole number of degrees.
The tables provide the tabulated altitude (Hc), altitude difference (d), and azimuth angle (Z). A correction is then applied to Hc to account for the remaining minutes of declination.
The computed altitude Hc is then compared with the observed and corrected altitude Ho:
These tables can be used for the Sun, Moon, planets, and stars.
The Easysextant website concentrates exclusively on their use for taking Sun sights.
One of the main advantages of these tables is that they eliminate the need to solve the spherical trigonometric formulas with a scientific calculator. Once you understand the layout and know how to enter the tables correctly, the method can also be very quick and efficient.
The concept, design, development, and preparation of these tables are the results of the collaborative efforts
and joint accomplishments of the National Imagery and Mapping Agency, the U.S. Naval Observatory, and Her Majesty’s Nautical Almanac Office, Royal Greenwich Observatory.
The tabular material in identical format has been published in the United Kingdom by the Hydrographic Department, Ministry of Defence (Navy).
Download HO 249 Tables – Volumes 2 and 3
Source: U.S. National Imagery and Mapping Agency (NIMA), now the National Geospatial-Intelligence Agency (NGA).
Publication: Pub. No. 249 — Sight Reduction Tables for Air Navigation.
Copyright: U.S. Government publication. No domestic copyright claimed under Title 17 U.S.C.
These files are provided free of charge for convenient access. This website is not affiliated with or endorsed by NGA.
5 HO 249 Latitude 0° – 40° / Declinations 0° – 29°
5 HO 249 Latitude 39° – 89° / Declinations 0° – 29°
For practical navigation, a printed copy of the volume covering your sailing latitudes, available from specialist marine booksellers, is a must. It remains especially valuable when navigating without any electronic assistance.
The PDFs provided here are intended mainly for study and training, to help you become familiar with the tables and their use.
Before You Begin: Preparing Your Sun Sight Data
To fully understand the use of the different sight-reduction tables—and, in our case, their use specifically for Sun sight reduction—you must first be able to calculate the LHA, Declination, and observed altitude (Ho) of the Sun corresponding to the exact time of the Sun sight observation. This is covered in Part One of the worksheet.
FIRST PART OF THE WORKSHEET
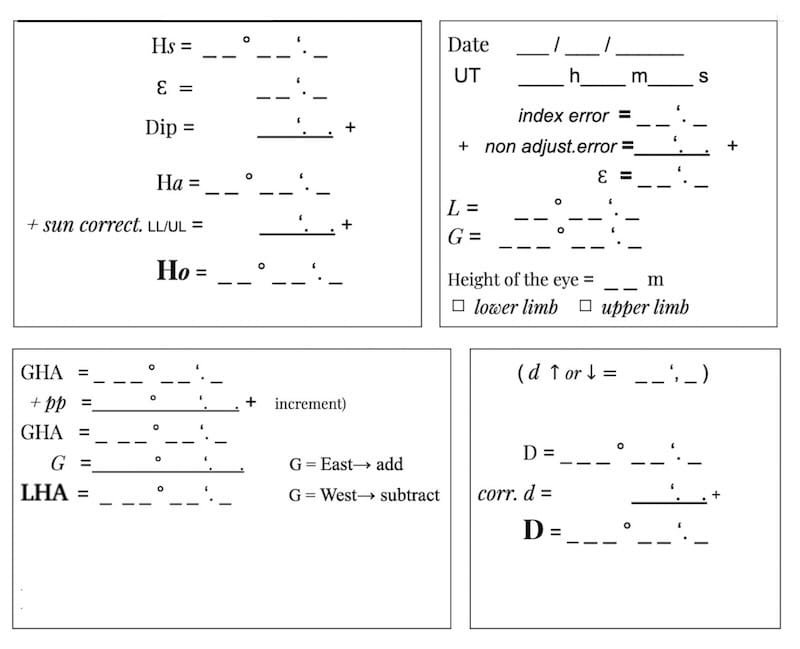
Part One is common to all the methods that follow for obtaining our final line of position.
This knowledge can be acquired on this website by following the “La Rochelle” exercise and then practising with the seven similar, fully worked-out exercises provided.
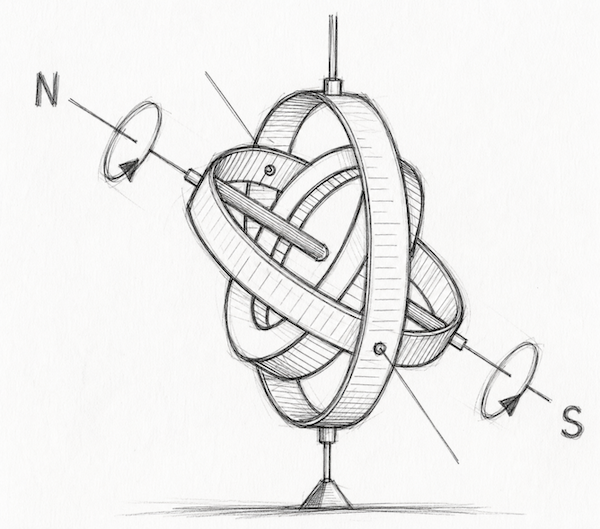
Instructions for HO 249 and NP 303
Step 1 – Determine the Assumed Position
- Round the Dead Reckoning (DR) latitude (L) to the nearest whole degree. This latitude is called the Assumed Latitude (La).
L = 52°16’ → La = 52°
L = 52°34’ → La = 53°
- Round the Local Hour Angle (LHA) to the nearest whole degree.
LHA =332°25 ’→ 332°
LHA = 332°37’ → 333°
Note: For assumed latitudes of 70° and above, HO 249 uses LHA values in 2° increments. These high-latitude cases are not covered in this simplified guide.
3 Take the whole-degree part of the Sun’s declination without rounding up. The remaining minutes are called the Declination Increment (Dec. Inc.).
D = 18°46’ N ; D = 18°N Dec.Inc. = 46’
4. Adjust the Dead Reckoning longitude so that the LHA is a whole degree. This longitude is called the Assumed Longitude (Ga).
Rounding the values above is straightforward, but finding the assumed longitude can be a bit challenging, so here are four examples.
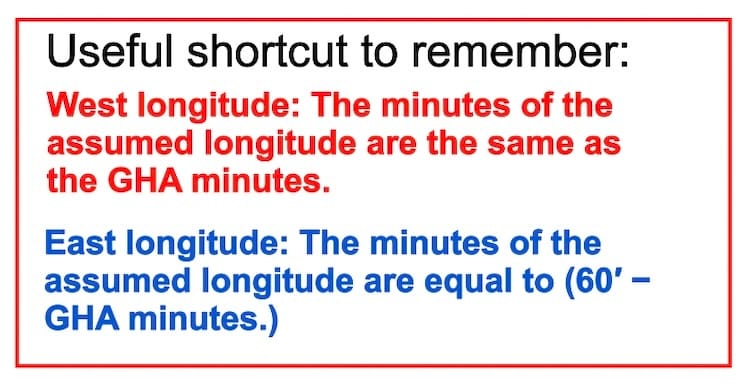
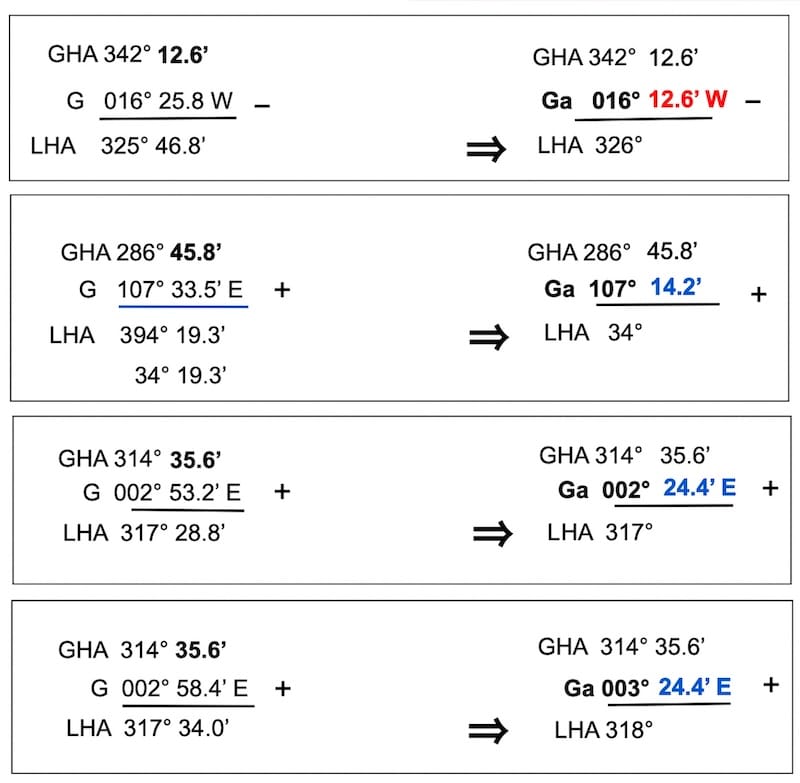
Step 2 – Identify the Required Values
La — Assumed Latitude
Ga — Assumed Longitude
To enter the HO 249 and NP 303 tables, you need three values expressed in whole degrees: the Local Hour Angle (LHA), the Assumed Latitude (La), and the Sun’s declination (D).
.
Step 3 – Find Hc, d, and Z in the Tables
Then, using the Latitude page, the LHA and D values, and the corresponding same-name/contrary-name page we obtain
( Hc d Z )
Hc — Tabulated altitude
d — Altitude difference
Z — Tabular azimuth angle
- Latitude: Select the appropriate volume (2 or 3), then the pages corresponding to your latitude.
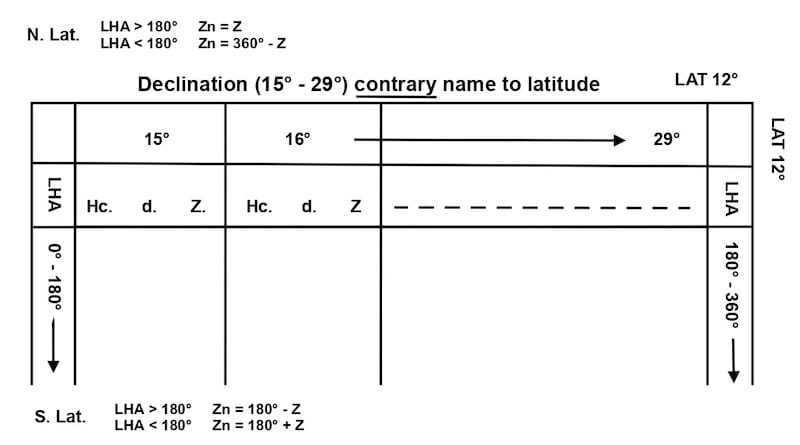
- Page Selection: Find the page that meets both conditions:
- The correct declination group (0°–14° or 15°–29°).
- The same or contrary name of latitude and declination (N/S).
- Find the Values: Use the declination and LHA to obtain Hc, d, and Z.
Note: Scroll down through the four figures below to understand the order in which the pages for the same latitude follow one another.
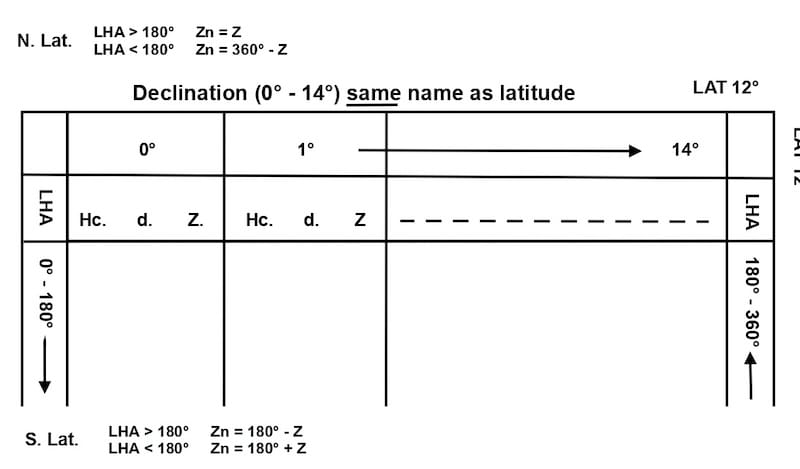
↓
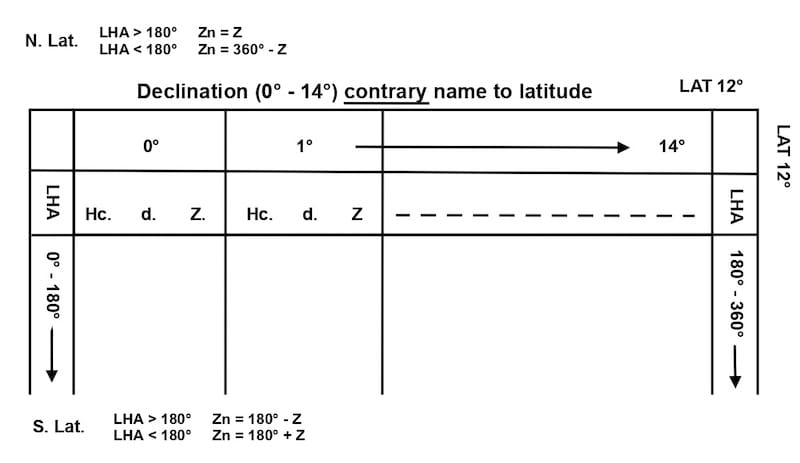
⇩
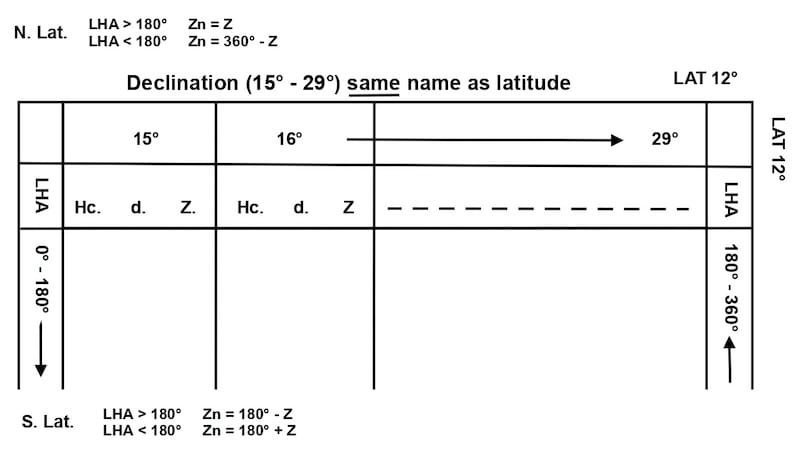
↓
Worked Examples – Same-Name and Contrary-Name Cases
LHA = 60°
Same name as declination
Latitude = 15° N
Declination = 5° N
or
Latitude = 15° S
Declination = 5° S
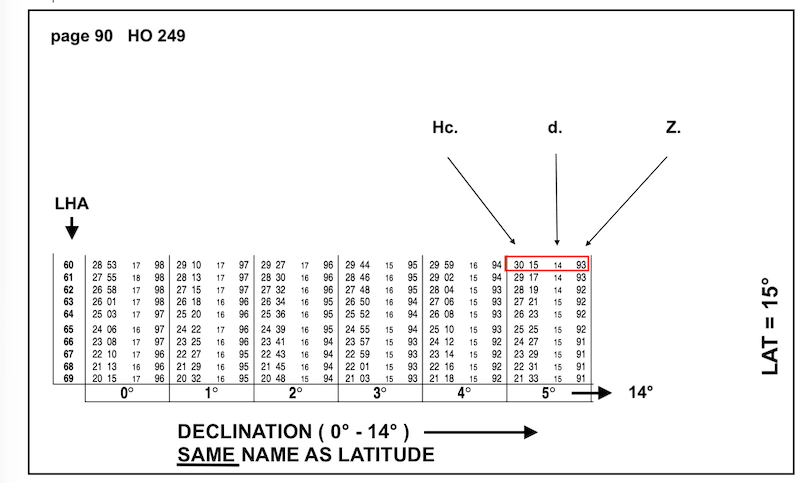
Tabular altitude Hc = 30° 15’
Altitude difference d = + 14’
Azimuth angle Z = 93°
LHA = 60°
Contrary name to declination
Latitude = 15° S
Declination = 5° N
or
Latitude = 15° N
Declination = 5° S
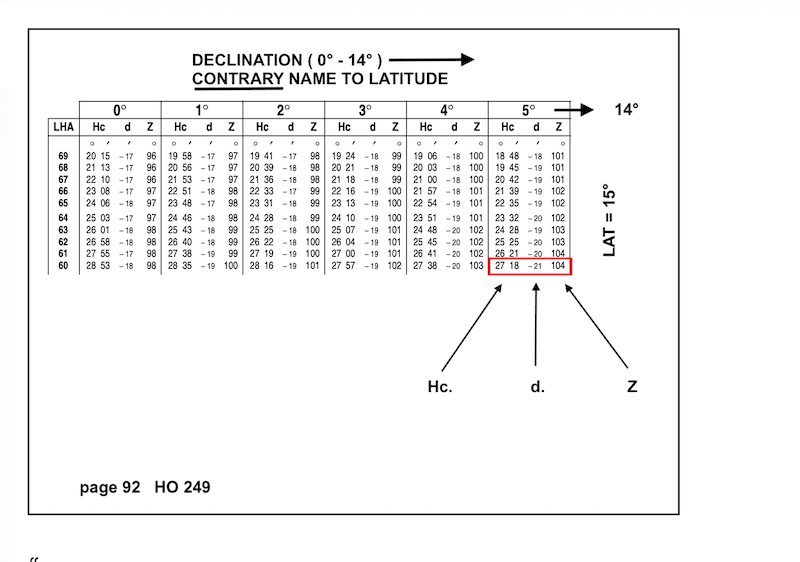
Tabular altitude ht (Tab. Hc) = 27°18’
Altitude difference d = − 21’
Azimuth angle Z = 104°
Converting the Tabular Azimuth (Z) to True Azimuth (Zn)
The HO 249 and NP 303 tables provide the azimuth angle Z, which must be converted into the true azimuth Zn, measured clockwise from true north (0° to 360°).
The conversion rules depend on the hemisphere of the Assumed Latitude and whether the LHA is greater or less than 180°.
These rules are printed on the table pages, so there is no need to memorize them.
Example 1 — Northern Latitude
LHA = 60°
Assumed Latitude = 15° N
Declination = 5° S
Tabular Azimuth Z = 104°
Since the latitude is North and LHA is less than 180°:
Zn = 360° − 104° = 256°
Example 2 — Southern Latitude
LHA = 300°
Assumed Latitude = 15° S
Declination = 5° S
Tabular Azimuth Z = 93°
Since the latitude is South and LHA is greater than 180°:
Zn = 180° − 93° = 87°
Note: For routine Sun sights, the tabulated azimuth angle Z can generally be used without interpolation for the remaining minutes of declination.
Step 4 – Correct Hc for Minutes of Declination
The tabulated altitude (Hc) must be corrected for the declination increment (Dec. Inc.).
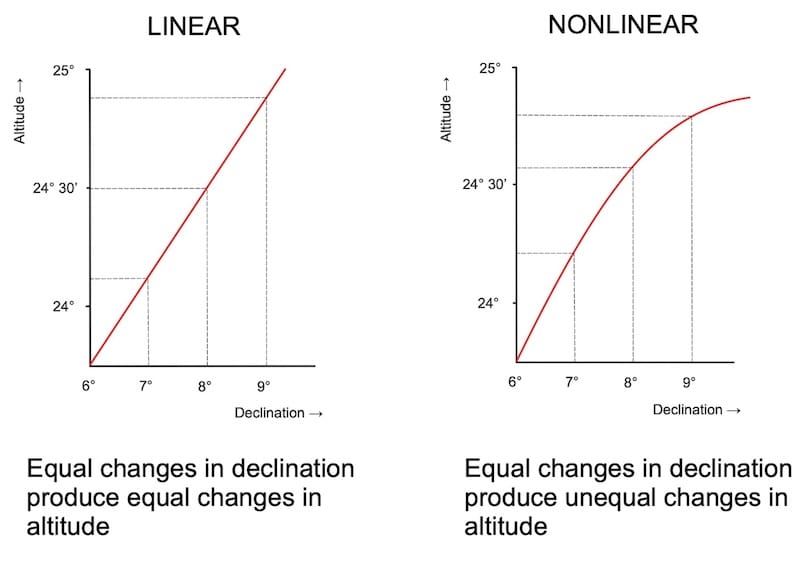
For routine Sun sights, the computed altitude is assumed to change approximately linearly with declination over the interval considered.
Method 1 – Calculate the Altitude Correction by Interpolation
This method assumes a linear relationship between the altitude difference (d) and the corresponding increment or decrement in declination, allowing the altitude correction to be calculated by proportional interpolation.
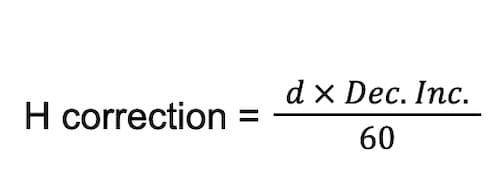
add or subtract according to the + or – sign of d
Hc final = Hc +/- H correction.
Example :
LHA = 60°
Dead Reckoning Latitude = 15° 22’N ⇒ Assumed Latitude = 15° N
Declination (Sun) = 5° 45.5’ N ⇒ D = 5° N and Dec.Inc. = 45.5’
Latitude same name as Declination
Tabular altitude Hc = 30° 15’
Altitude difference d = +14’
Azimuth angle Z = 93°
H correction = +14′ × 45.5′ / 60 = + 10.6’
Final Hc = 30°15′ + 10.6′ = 30°25.6′
Method 2 – Use Table 5 for the Altitude Correction
Declination = 5° 45.5’ N ⇒ D = 5° N and Dec.Inc. = 45.5’
Tabular altitude Hc = 30° 15’
Altitude difference d = +14’
Azimuth angle Z = 93
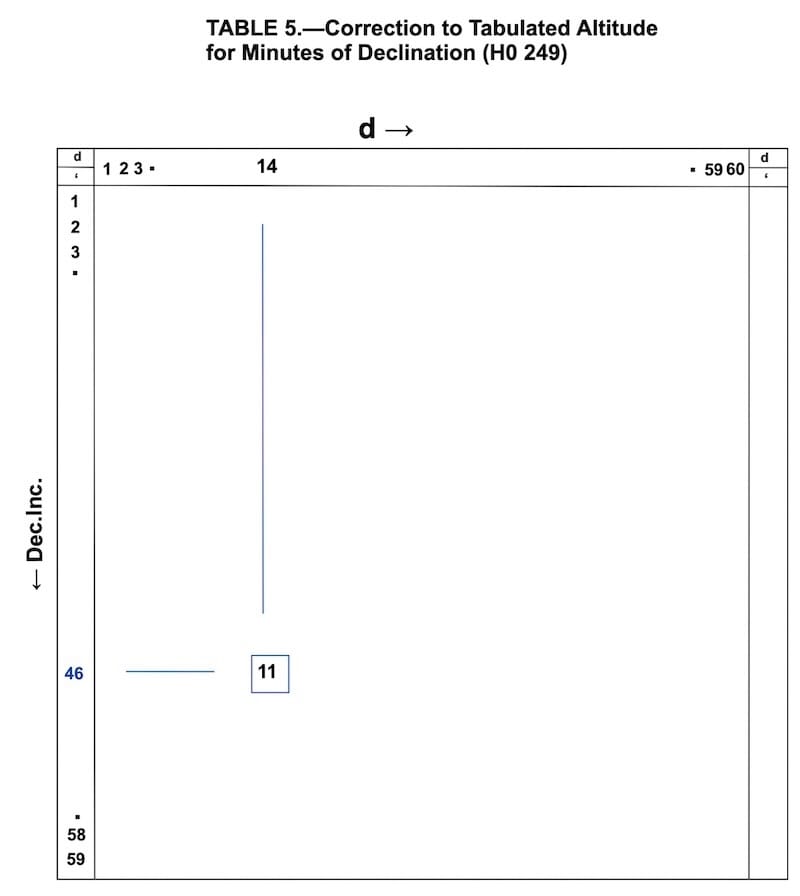
Dec.Inc. = 45.5′ → 46’ ; d = + 14’ ⇒ H correction is 11’
Either d or Dec. Inc. may be read along the horizontal axis, with the other read along the vertical axis. The same required correction is found at their intersection.
In Table 5, interchanging d and the Declination Increment does not change the correction for values from 1′ to 59′, because the table is symmetric about its main diagonal. The only limitation is at the 0’/60′ boundaries, where the printed table is not square.
Table 5 is satisfactory for practical cruising. However, when a simple calculator is available on board, the formula used in the first method may be preferable. It provides a precise result and is likely to be at least as quick as consulting the interpolation tables.
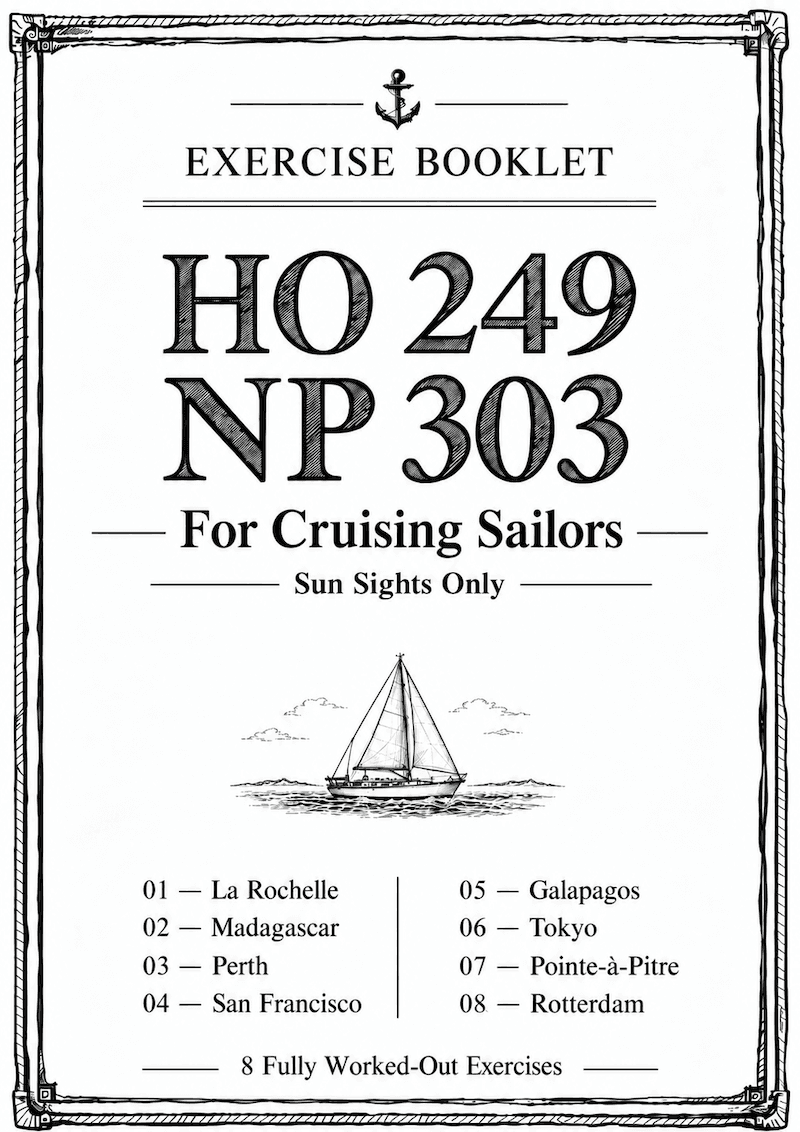
Eight Practical Exercises with Fully Worked Solutions
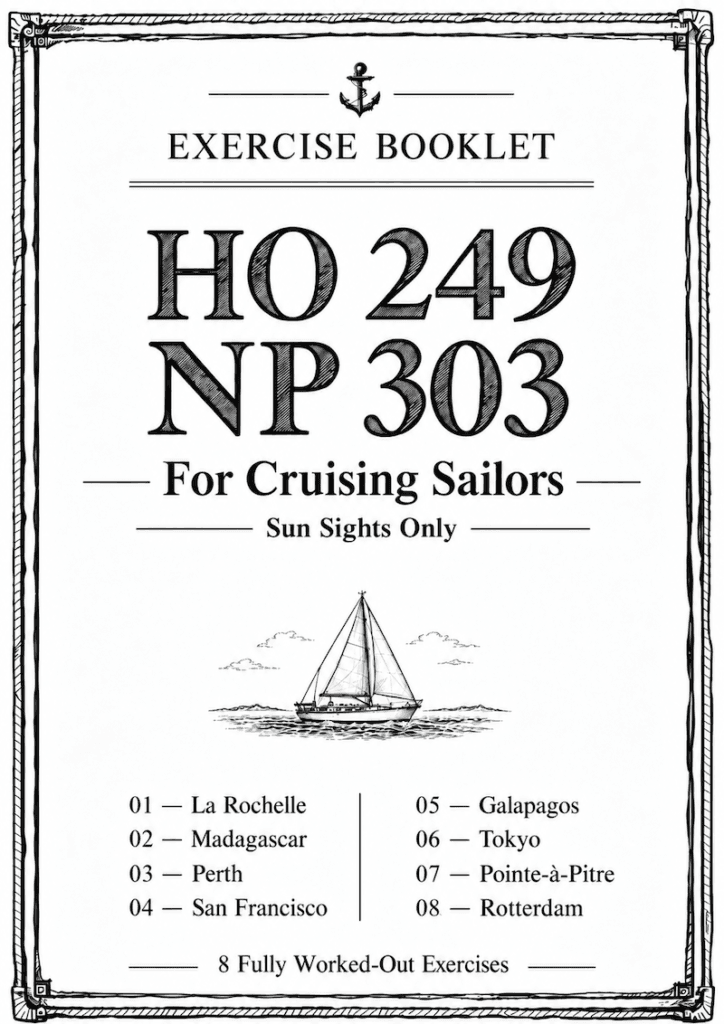
The accompanying booklet contains eight fully worked examples designed to help you become familiar with the HO 249 and NP 303 tables.
By practising these exercises several times, you will develop a clear understanding of the procedure and become more confident in using the tables for Sun sight reduction.
Comparing Lines of Position: Calculator vs. HO 249 / NP 303
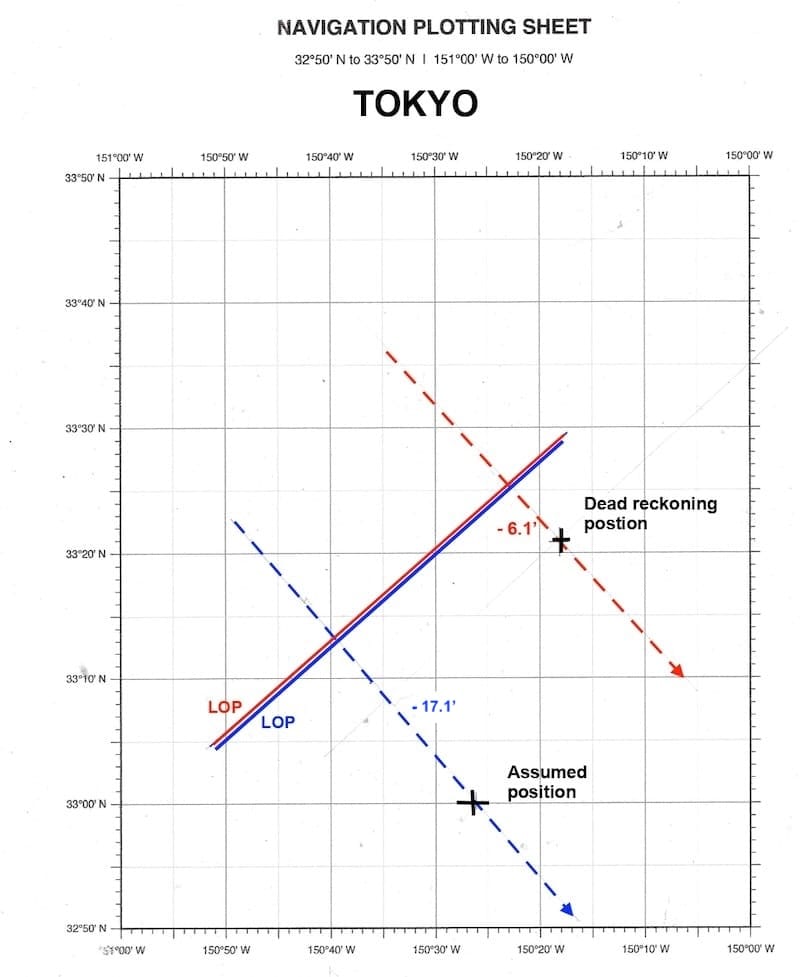
What is the difference between a Line of Position (LOP) calculated from the Dead Reckoning position using a calculator and one obtained using an Assumed Position and the HO 249 or NP 303 tables?
When the Assumed Position is selected correctly, both methods should produce Lines of Position that are very close together or overlap.
TOKYO:
Calculator: intercept = – 6.1’; Zv = 139.3°
HO 249 / NP 303: intercept = – 17.1′; Zv = 139°
POINTE A PITRE:
Calculator: intercept = + 3.3’; Zv = 119.6°
HO 249 / NP 303: intercept = + 29.9’; Zv = 119°
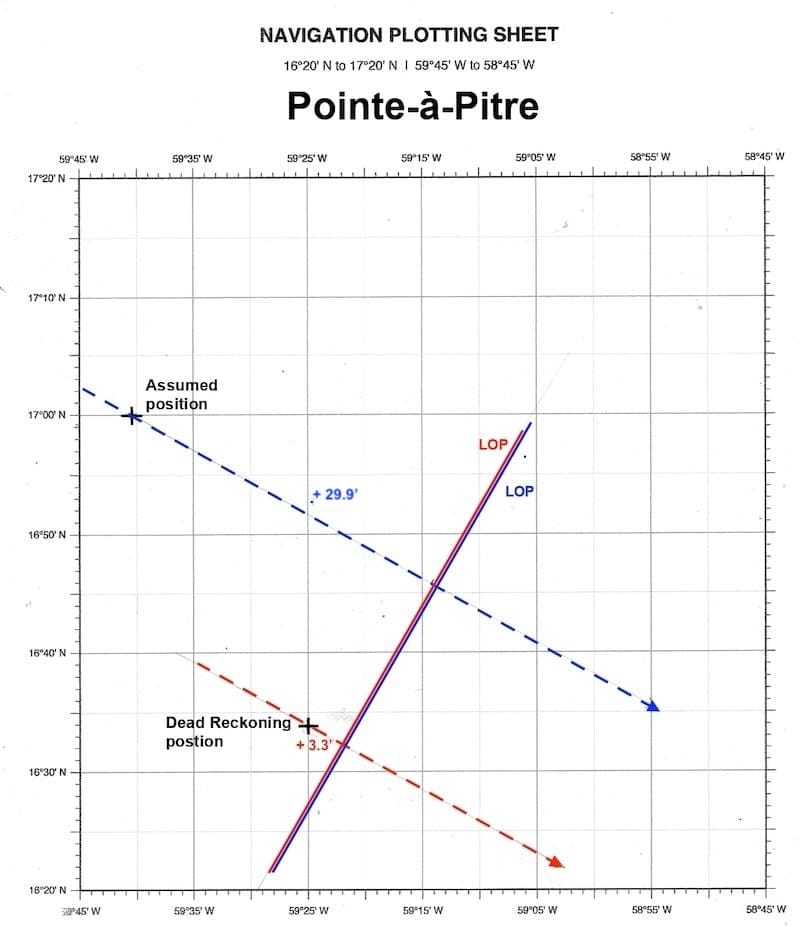
The intercept values are different because each method uses a different reference position. This does not necessarily mean that the resulting Lines of Position are different.
To compare the two methods correctly, both Lines of Position must be plotted on the same chart using their respective reference positions, intercepts, and azimuths.